OnSite NXT Preview – Designs


Hi, everyone. This is Jay from ShopWorks and in this OnSite NXT preview video, we’re going to look at designs. And we’re going to contrast how designs are handled in the current OnSite system and how they’re going to be handled in OnSite NXT.

In the current OnSite system, the concept of designs is a little quirky. And our goal for OnSite NXT was to kind of eliminate those quirkiness, little quirky things. We’ll talk about those in a minute, and to improve and simplify the entire design system, and of course make it more powerful as well.

And let’s start by talking about some of those quirky things, and then we’ll kind of show you.  I’ll do some demo and show you how we handle design and OnSite, current, and how we will handle it in OnSite NXT.

So, the number one point here is a design in the current OnSite can mean different things. It can be a single design location, or it can be in multiple design locations. This is confusing to users, especially new ShopWorks customers.

Most people tend to think of a design as a single thing, as opposed to a collection of things. The second point here is in the current OnSite, there are designs and then there are order designs.

And as you know, these can be different for a given design number; the order design can be different from the actual design master design. And this requires that if you want to, the designs have to be synced. This does add some flexibility to the system, but in general, we found that it’s confusing.

And if you don’t manage it properly, it can cause mistakes on orders. So, we’ve kind of revamped how that’s done.

And that second point leads to our third point. Because there are multiple places to manage a design, being on the master design and then on the orders, as well. There are multiple places to manage the design, whether it’s done or not, what it looks like, print locations or embellishment locations.

All of those can be managed from the design section and possibly also on an order. So that is not an ideal situation.

And that’s going to be changed here in OnSite NXT. But before we get to OnSite NXT, let’s kind of look at the current OnSite.

So, I’m flipping over here to OnSite, and we’re already in our design section.

And we’re going to look at DC Special Olympics.

As I’ve done in previous demos, this is a saved customer that we do a lot of business with in our fictional world of running an embellishment shop. And we’re going to look at our torch run 2024.

So, in the current OnSite, you can see this is a single design number twenty eleven. And that design number has two different locations, a full front, and a full back.

Three colors on each. I’m not going to get into the details of this. There are custom fields.

You know, as a current user, whether it’s screen printing or embroidery or promotional products or whatever defines how this is going to look. They can look a little bit different based on the design type in the current OnSite.

And so, this is what we call the master design or the key design. This is the source data of the design line.

Now if we go over to our sales department, let’s bring up our DC Special Olympics orders.

And I’m going to go down here to the tour, an order that has tour 2024 on it.

And if I go to the design here, this is the same design that we had in our design section. However, there are certain settings that control this, so you do have some control, but I can make one-time changes to the design right from here. So, let’s say, for example, on this particular order, the customer only wanted the front print. They didn’t want the back print. Well, I can just eliminate the back.

Now what’s the problem with that? That seems pretty flexible. It is flexible, but there are some problems with it. Problem number one is it’s the same design number.

So, people on your shop floor could get confused on an order. They could just read the design number and pull the design, and they would see the films for that design. Let’s say you’re using films.

And then they would say, oh, well, it’s a front put it in a back they might ignore the paperwork or this computer system, and they might actually print the front and the back accidentally. So, the fact that it’s the same design number, but actually a different configuration.

Although it’s flexible, it can introduce errors into your shop. The other thing is colors can be changed. Things can be changed. So, on this particular order, they want to add, or maybe they would add another location, which is a name drop.

So, there’s lots of flexibility to it, but that flexibility can inadvertently introduce errors, into your printing or embroidering or whatever kind of embellishment you’re doing. I tend to show these examples from a screen printing because that’s my background, more screen-printing embroidery, but everything I’m telling you applies no matter what kind of embellishment you’re doing.

So that kind of requires we really have a separate design. It’s the same design number, twenty eleven, but it’s really produced separately. So again, that’s kind of a problem. There are some potential benefits to it, but there’s also some problems with it. And we’re from what we see with customers, there’s more problems than benefits.

Now we have some other concepts in the system like design variations, which is a way around this, where you can create a variation of a design. And then force your users to use the variation. But all this requires procedural stuff on your end that you understand our system, how it works, and that you know, procedurally, you create your own procedures.

So that’s kind of the disconnect between the designs and order designs.

Also, the status is different. So, if I go into my production portion of OnSite, and I changed the design status of this, I have to push that design change to the master design. The same is true, the opposite direction.

If I go into designs and I go to production, I can see which orders this is being used on, and I can update those orders with this master design information if I want to, or I can do the reverse. I can go to the order and push the order changes to the design.

And there’s no rules to this. It can be done, you know, so again, that requires procedural stuff on your end to make sure things don’t get screwed up, etcetera, etcetera. So, one of our key things with OnSite NXT is we wanted to find a way to simplify this.

So, I’m going to close this down.

And let’s go over here to our OnSite. So, this is OnSite NXT. And if you watched the video on the UI UX user interface, user experience, you know that it’s more floating windows and multiple windows and stuff like that. So, this is my main app, if you will, the ShopWorks app or OnSite NXT app. And I’m going to go to designs, and it’s going to take me to my design’s main menu.

And I’m going to bring up all my torch run designs and you can see there’s our different designs. Now the first thing I want you to know is that designs in OnSite NXT are single design location only. So, we’re eliminating the ability to have multiple design locations on a design. Now that sounds horrible.

When I tell you that, you’re like, oh, that’s huge functionality. Well, most of our designs are multi location. I’m going to show you how we’re going to handle it in OnSite NXT. But it eliminates the confusion of, a single design meaning multiple locations.

So, if you only want to print one location, then you’re just going to select the one location. So, let’s kind of just continue with this thought process a little bit, and this will make more sense.

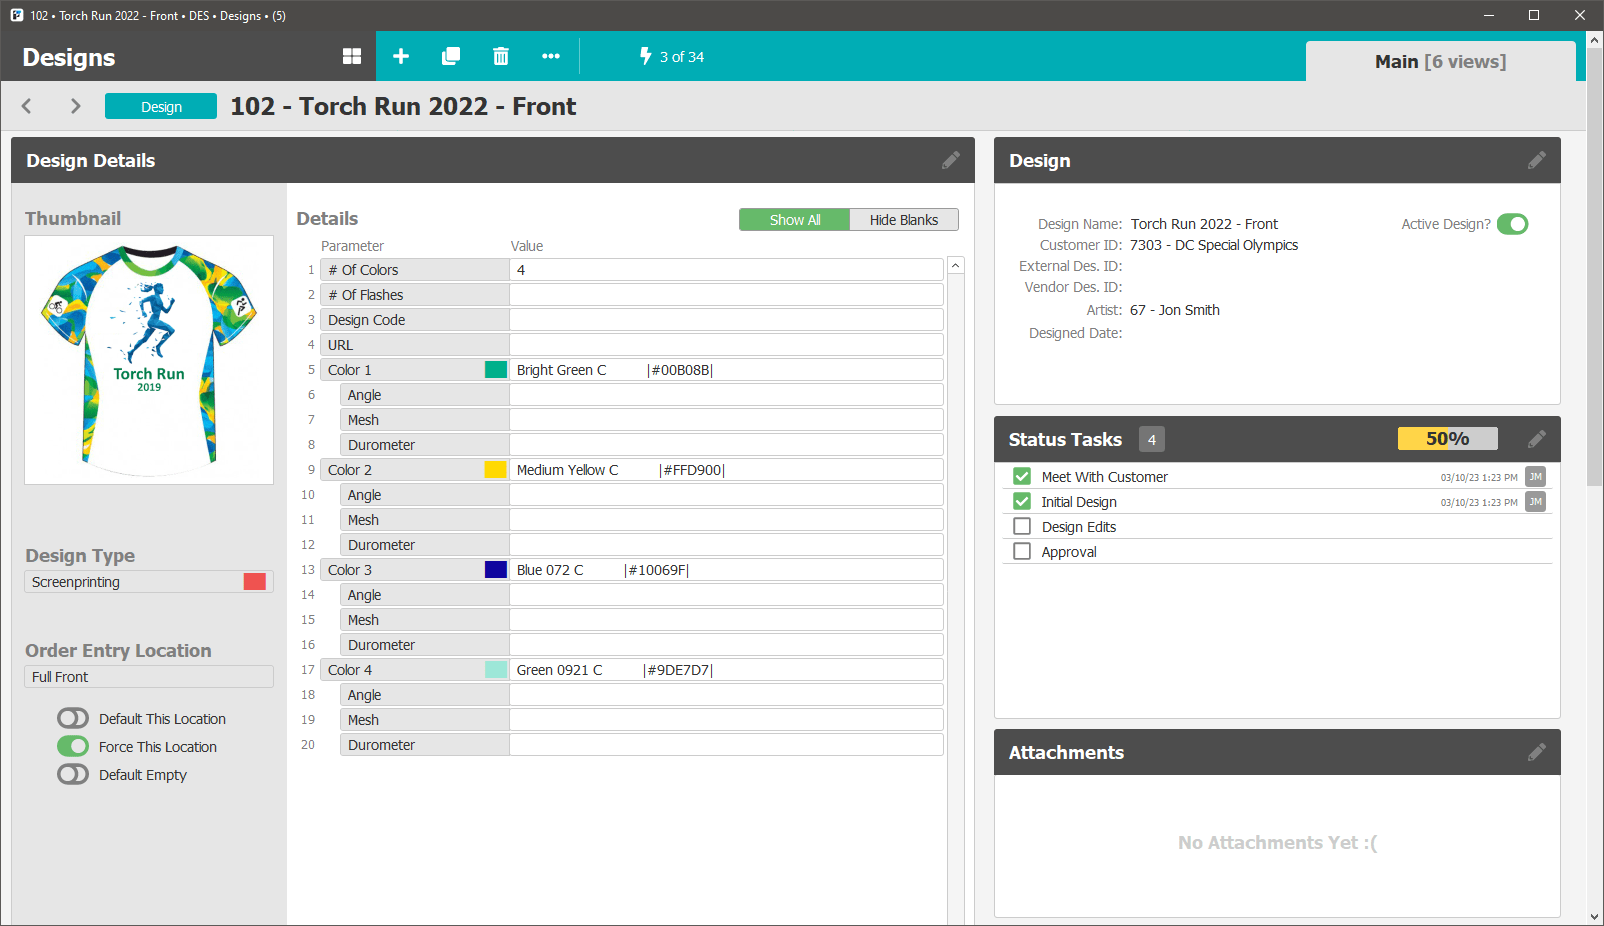
So, I can see here my designs, I have design ID one zero two and design ID one zero three. And if I click on one of those, it’s going to open up. There’s the front. And if I want to, I can open up. There’s the back. And because we’re, you know, using a large monitor here, and I have multiple windows, there is some consideration for Windows management that’s covered in, you know, you can get a crazy amount of windows going on here. So, I don’t have to open up these windows, but it’s nice because I can put them side by side here. I can minimize that window. And now I have my two designs locations, right next to each other.

So again, here’s my full front and full back of this design. Same as we did in the old system, but instead of being one design, it’s two designs. I want you to just notice a couple things here.

The details, every design is going to be parameter based. What does that mean? Well, what that means is in your current OnSite system, there are certain design configurations. You have a screen print design configuration, embroidery design configuration, and that kind of hard wires how many custom fields you have, the look of the fields, and all that sort of thing.

Well, we’ve made that much more flexible in OnSite NXT. Every design, you define what’s in that design. So, every design type, we still have the concept of design types. So, you can see your screen printing. You can have embroidery, you can have promotional products, awards, whatever you want.

You can have as many different design types as you want. But instead of you having to use our ShopWorks hard wired design configurations, you don’t have to do that anymore. You can go down as far as you want.

So, it’s not a horizontal grid anymore. It’s just vertical information. But the value of that is it allows you to create as many different colors as you want as there’s no limitation on colors. There’s no limitation on number of parameters.

You have a lot more flexibility in the system. Now remember, this is just a preview video. So, I’m just kind of previewing things for you. As we get closer to release, we will have actual more in-depth training videos for you. So, I’m not going to go into everything in these videos. I’m just kind of giving you a taste of what we’re doing here.

Now a couple other things I’d like you to notice, there’s a there’s tasks associated with a design. And as those tasks are clicked off, it stamps who did it, and it updates the percentage.

We have attachments, and I’m going to give you a little teaser for the future because I’m going to do some more of these videos.  We have some additional concepts we’re introducing for OnSite NXT, and a huge one is “tickets”. So, “tickets” is going to really help you with your workflow.

Queuing and workflow and knowing when things are done and getting things done, tickets, and queues are going to be concepts. We’ll introduce those in another video. But you can see here there’s tickets, meaning work that needs to be done associated with this particular design.

Of course, you have attachments, you have a thumbnail image, click on the thumbnail image, you get a zoom just like you did before.

Now the other thing I want you to notice here is collections.

So that’s kind of a new concept we’re introducing in OnSite NXT. So, let’s just kind of make these windows go away here.

And let’s go back over to our main, designs window.

And instead of designs, I want to look at design collections.

So, design collections let’s look at all my active design collections.

Let’s go back to collections.

We have an error here, so remember this is in development; still lots of glitches to iron out.

Let’s go back to our design collections.

And let’s just bring up all of our design collections. So, if I go to design collections, I can see one called torch Run shirts 2022. Now what is that? Well, if I go to it, this is a collection of multiple design locations.

So, this is how we’re going to handle multiple design locations in OnSite NXT. And there’s a lot of power in this because, one of the things that you can’t do in your current OnSite is you can’t have a design that has multiple embellishment types on it that still true in OnSite NXT, but a design collection can have multiple embellishment types. So, for example, if I had a screen printed front, or screen printed back, let’s say, in an embroidered front, I could have a design collection that would allow me to have that have screen printing. I can have embroidery.

I can have whatever I want on there. And the power of that is that when someone goes to order entry, and there’s they don’t they can select individual design locations, or they can select the entire design collection. And in this case, you know, we have a shirt that’s a front and a back. So, the user would select from the collection, and it would select all those items.

Now we’ll get into that more when we get into the, like, how order entry is done. We’ll illustrate that for you. I’m not going to show you that in this video. However, just kind of that’s where we’re going with this.

So, when someone is a user and they’re going to select a design for an order, they can either select from an individual design location or they can select from a design collection. And as I mentioned, the design collections could have multiple embellishment types in it, so that is very powerful.

Alright. So, what are our key takeaways on designs?

Well, let’s start at the top. All designs are parameter based. And what that means is you get to define what every design is and how it works. There’s usually going to be a lot more power, a lot more flexibility in how designs are configured in the system. All designs are going to be single location only.  Now, that means there’s a lot of simplification.

When a design’s done in OnSite NXT, let’s go over here to a design. When a design’s done and OnSite NXT, it’s done everywhere. It’s done on every order. There’s no more having to sync between order designs and the master design.

There’s only a design. That’s it. Now we still have concepts of and again, I’m not showing you this here in this particular video, but you’re still going to have design variations So, for example, we have a one-time change that a customer wants to do to this particular design. Well, you’re going to create a design variation of this design.

You’re going to make your changes, and that’s what’s going to be used on the order. And that’s going to help eliminate problems on orders, miscommunication, because a design in the new system, a design is a design is a design. If you want to make a different design or a variation of a design, you can do that. But the design is what the design is in the new OnSite NXT.

They’re all single location only, as I mentioned, and the additional power that we’re going to add to that single location only because it does take away some functionality is that we have design collections, so design collections are going to allow you to combine these designs together into collections.

And that’s going to handle cases where you want multiple locations.

And the last new concept is there are no more order designs. We’re eliminating that it was causing more problems and confusion than solutions.

So, if you do want changes to a design, it’s going to require a new design or a new variation.

Now I know some ShopWorks customers might not like that.

Because it is taking away some flexibility.

However, we think procedurally. It’s just a better way to do it.

And it’s going to eliminate more problems than benefits. So that’s what we’re going with for OnSite NXT.

Alright. Well, thanks for your time. This video is coming to a conclusion. We’ll have more coming soon. More previews. We’ll get into the new tickets and, queues that I mentioned. That’s a cool new feature.

Workflow is really cool in the new OnSite NXT to be better workflow.

Allows you to know what’s going on with your business.

So, we have a lot more to show you. Those will be coming in more videos. So, keep your eyes peeled for the next  preview video. Thank you.

Power to the Wearables

Wearable technology word cloud in the shape of a manWearable tech comes in all sorts of shapes and sizes, ranging from 3D printed shoes that promise to match your feet exactly to bracelets that make you feel hot or cold (regardless of what the actual room or body temp is) to a watch that’s a simple phone and includes a GPS tracker–intended to track your kids.

Power to the Wearables

An intriguing trend within wearable tech has been power-generating garments. One example has been the SolePower, a shoe that takes the kinetic energy made by walking around and converts it into electric power, then stores it in a battery pack that can charge a phone. Other wearable power plants include jackets with solar panels in the back and–perhaps most interesting–a new fabric that uses static electricity as the power source.

Static Electricity – The Next Way to Power Your Device?

The new fabric (called a wearable triboelectric nanogenerator, or WTNG) was created at South Korea’s Sungkyunkwan University by a group of scientists led by Sang-Woo Kim. It’s made of two layers of fabric: one of silver-coated fibers, the other made of zinc oxide nanorods coated with polydimethylsiloxane (a silicone used in many consumer products–try pronouncing it!) When the wearer moves in typical day-to-day motions, the two layers rub together, producing a triboelectric effect–the same thing that causes the static electricity made when, say, when a balloon is rubbed on hair or silk on glass. When the two materials rub together, electrons transfer between the surfaces, which creates a positive charge on one side and a negative charge on the other.

When the materials separate during the motion, this creates a small electric current–something akin to the “snap” you get when you reach for a metal doorknob after walking on the carpet on a windy day. Thankfully, not every pair of materials does this, or walking down the street would be a little more, ahem, electrifying than it is. Professor Kim and his team found that silver and nanopatterned polydimethylsiloxane were the best matches. The 100-nanometer zinc oxide nanorods increase the contact area, which equals greater friction and therefore greater power output. Also, the more layers there are, the greater the output.

cloth2

Attached to a jacket sleeve, the fabric successfully powered six embedded LEDs, a small LCD, and a keyless car remote inside the jacket. The wearer’s wrist movements produced enough power–without any external power–to turn each device on, although only one at a time.

It has its limitations. It couldn’t, as it is, power a smartphone, although perhaps if paired with a battery pack, it could store the power generated for emergencies. And don’t expect whole jackets of this material just yet–a silicone jacket would get sweaty fast.

So the question is, will we see wearable tech move into the decorated apparel market? It probably won’t get as popular as the famous Hanes Beefy T, but wearables might very well move into the space if popularity increases.

Anyhow, now it’s back to the shop and managing those orders.

Heat Transfer and Screen Printing T Shirts – What’s the Difference?

Heat Transfers Vs. Plastisol Transfers Vs. Screen Printing

One question that comes up often in decorated apparel circles is, “What are heat transfers and screen printing and how are they different?” Today, we’ll answer that question.

Heat Transfer

heat transfer
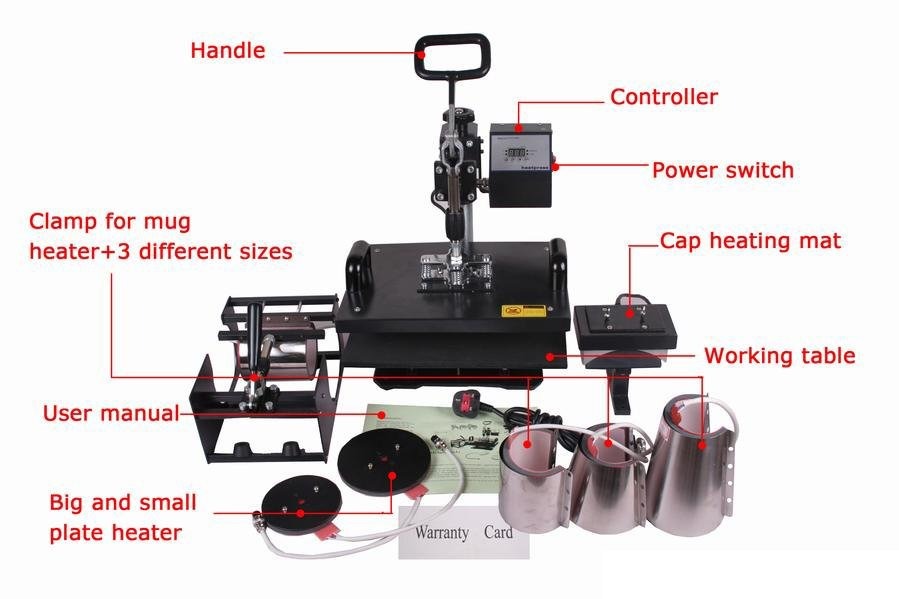
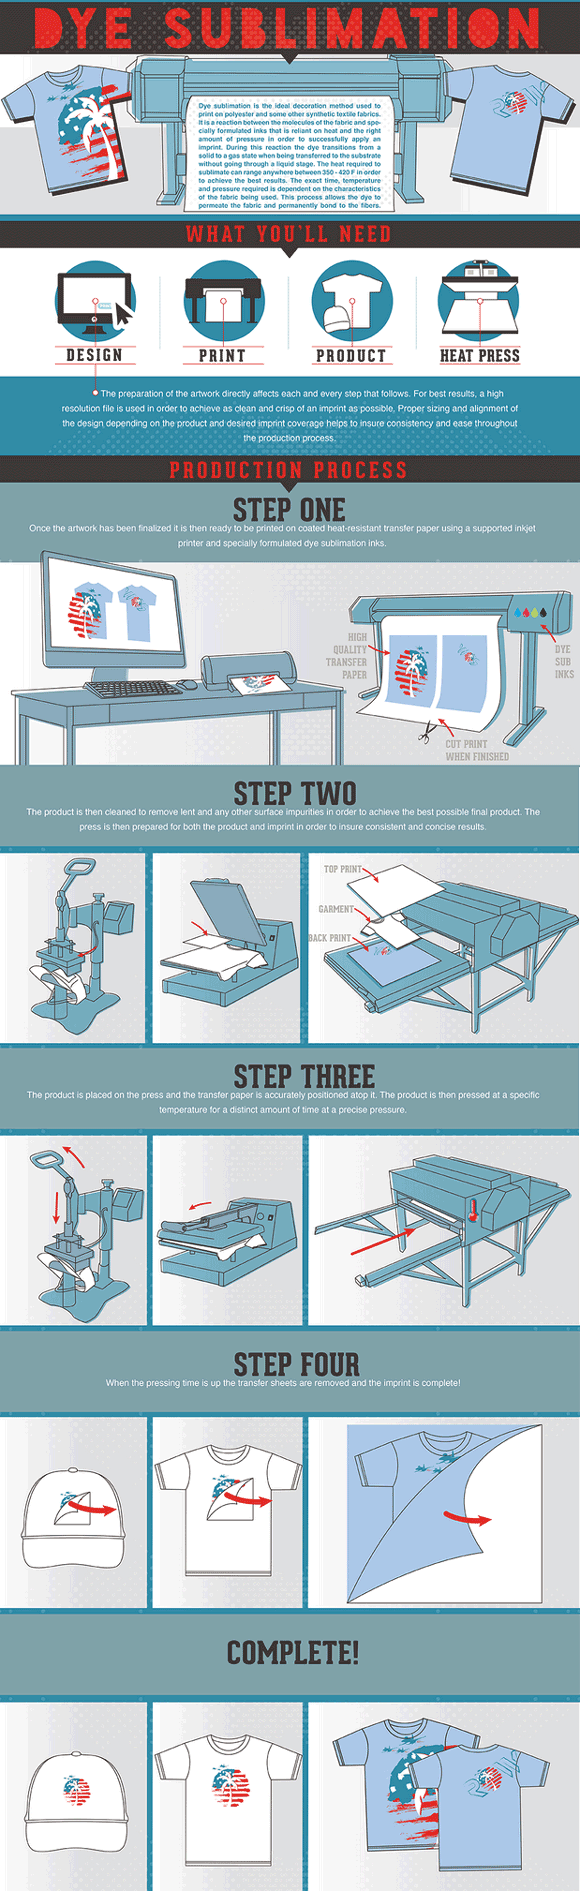
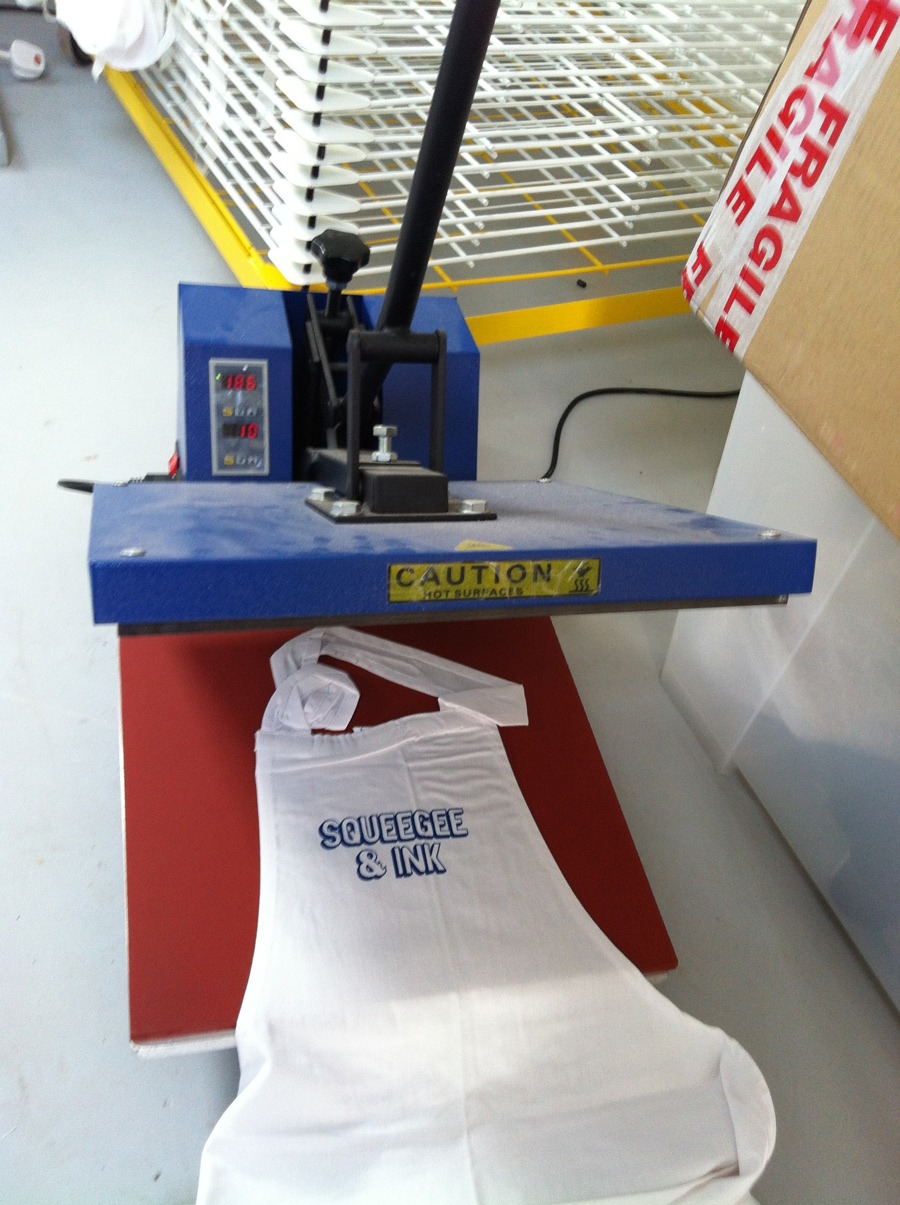
To start off, let’s discuss what heat transfer is. Heat transfer is the process of applying an ink-based design (usually one printed on a sheet of special transfer paper) to the product to be decorated (usually a t-shirt) with a heat press machine. As the name implies, a heat press machine works by using heat and pressure to apply the design to the garment.

heat press machine is designed to use and control the three key factors needed to apply the decoration: time, temperature, and pressure. For example, when customizing polyester open mesh sports jerseys a recommended practice is to heat the press to 300 degrees Fahrenheit and then press down with firm pressure for 10 seconds. On the other hand, when applying plastisol transfers, it’s best to heat the press to 350 degrees Fahrenheit and then press down for 10 seconds. Even though it’s just a couple of degrees difference it’s important.

Two of the most popular heat transfer methods are transfer paper (inkjet) printing and plastisol transfer printing.

Transfer Paper (Inkjet)

In the transfer paper method, an inkjet printer prints a sheet of special transfer paper with the proper ink. Then, the paper is laid on the shirt (or other surfaces) and a heated press is applied for a few seconds. The exact time depends on the type of printing and material.

For light-colored garments, the mirror of the original desired image is printed on paper, then the transfer process puts the mirror of the mirror (the original) on the garment. However, on dark garments, the design is printed without mirroring. This is partly because inkjet printers cannot print white. Therefore, on white garments, all that’s necessary is not print white areas of the design and let the original color show through, while dark garments need certain transfer papers that are covered with transferable white ink.

Advantages:

  • Easy to do: make your design on a computer, print it out, and press it on
  • No minimums: you can print 10 shirts with completely different designs or easily switch names and numbers on sports jersey customizations almost as easily as doing one design
  • Can print the same or similar design on garments made with completely different fabrics: nylon, cotton, and polyester.
  • Can duplicate embroidery
  • Works great on polyester open mesh jerseys

Disadvantages:

  • Inkjet transfer paper designs for clothes have poor washability compared to screen-printed ones
  • Might not be the best option for large orders, since each shirt needs its own paper printed individually

Plastisol Transfers

Plastisol transfers are similar to transfer papers in that the decoration is applied to special paper first, then transferred to the product from the paper. The difference is that in the transfer paper method the paper is printed on by an inkjet printer and plastisol transfers are printed the paper on by screen printing.

The plastisol transfer paper is put underneath the screen on a screen printing machine. Then, the same process of printing a shirt (described below) is done, but instead of the plastisol ink being printed directly on the shirt it is printed on paper. Then, a sand-like grain is spread on top of the plastisol so that the design doesn’t blur. This also makes it easy to store the plastisol transfer in a folder for future use.

After the paper is printed, a heat press machine applies the paper to the garment. The advantage of plastisol heat transfers is that it makes otherwise tough-to-print locations easy since aligning a shirt on a heat press machine is far easier and quicker than on a screen printing platform.

Advantages:

  • More durable than transfer printing
  • Easier print alignment than screen printing
  • No minimums: you can print 10 shirts with completely different designs or easily switch names and numbers on sports jersey customizations
  • Can print the same or similar design on garments made with completely different fabrics: nylon, cotton, and polyester.

Disadvantages:

  • Can not do half-tones or print photos
  • Might not be the best option for large orders, since each shirt needs its own paper printed individually

The following infographic illustrates a form of transfer paper printing called dye sublimation. This gives a good overall view of the heat transfer process…by Row Apparel.

heat press machine

Screen Printing

heat pressNow that we’ve discussed heat transfer, let’s talk about screen printing. The Chinese invented screen printing thousands of years ago. At first, they used silk screens for the process which is why another name for screen printing is silk screening. The reason the process has lasted, in one form or another, for thousands of years is its efficiency. To way oversimplify, screen printing is the process of applying ink, through screens, on many objects–not just shirts. Pens, bottles, hats, business cards, flyers, and more have all been screen printed.

Screen printing is complex and requires much more equipment–and chemicals–than heat transfer. For example, the emulsion is needed to create a screen and then three products – ink thinner, emulsion remover, and dehaze are needed to clean the screen after just one use. In addition, equipment like a washout booth is needed to both clean screens and create them. On top of all that, it requires a dark room to store the screens, a light machine to burn the screens, a flash dryer, and conveyor belt dryer to dry the screens, and a screen printing machine to actually print something. Then, of course, there’s all the little stuff like squeegees, scrubbers, tape, films, a printer to burn the film, at least 20 screens in various mesh sizes, and plastisol inks in various colors.

Screen printing usually requires a minimum order to be efficient. There is more setup time involved than heat transfer printing, but the setup time is exactly the same whether the order is for one shirt or one thousand shirts. Once the screens are aligned and the ink is put on them, all that’s left is to put on and take off the shirts from the machine (and possibly change ink on large orders). Therefore, only one design can be printed at a time, although ink colors can be changed and different garments can be printed with the design so long as it’s made from the same type of fabric.

Two common inks used are plastisol ink (the most popular) and water-based inks.

Screen printing is a great printing process that’s been around for thousands of years and will be around for thousands of years more. It’s an efficient way to print both full color and single color designs on shirts and it’s so versatile the customer’s imagination is the limit!

Overall Screen Printing Advantages:

  • Best for large orders
  • Multiple printing options
  • Can print very fine details
  • Very versatile: most garments can be screen printed with no problem

Overall Screen Printing Disadvantages:

  • Needs a minimum order amount to be cost-effective
  • Must print one design at a time

Plastisol Screen Printing

Plastisol ink is PVC based and, unlike water-based inks (discussed below), has no solvent. Like the UV ink used in graphic screen printing, it’s therefore referred to as a 100% solid ink system. Plastisol is thermoplastic; in other words, it’s necessary to heat the printed ink film to a temperature high enough (usually about 300 °F to 330°F) to cause the PVC resin and plasticizer to cross-link and solidify, or cure.

It’s important to keep plastisol ink clean since clean ink can be returned to the original container for reuse.

Advantages

  • Plastisol ink is user-friendly and easy to manage
  • Plastisol ink is ready to use right out of the can almost 100% of the time, and, for most applications, it can be printed wet-on-wet (before the previous ink has dried), which allows for increased production speed. It comes in formulations for both light and dark fabrics. And, in most localities, the disposal of waste plastisol is quite simple.
  • Plastisol doesn’t dry. For a compound to dry, it must be dissolved in a solvent and that solvent must evaporate. Since plastisol has little or no solvent, it can’t dry. Because of this, plastisol can be left in screens for extended periods of time, the lids can be left off of the ink containers (although keeping them covered is a good practice to keep the ink clean), and ink left over at the end of the job can be returned to the container for reuse without any bad effects–thus reducing waste.
  • Plastisol is versatile since most printers never have to amend the ink–it can be used directly from the container without ever needing to adjust the viscosity (thickness) or strength.
  • Plastisol comes in many strengths, from transparent to opaque. Most printers will keep various strengths on hand, as the strength should match the type and color of fabric they are printing on. The various opacities of ink vary greatly in price: the most opaque strengths are the most expensive, mainly because the increased pigment costs more. So only use the proper opacity for each fabric to keep things cost-effective.

Disadvantages

  • Since plastisol is a thermoplastic, it will remelt if it contacts anything hot enough. Therefore, plastisol prints cannot be ironed–if an iron touches a plastisol print, it will smear the ink.
  • Plastisol ink creates an ink film that sits on top of the fabric, so to speak. This film can be felt with the hand. The higher the ink’s opacity, the heavier the “hand”. This “heavy hand” can be a disadvantage from the consumer’s point of view.

Water-Based Screen Printing

Some customers and print shops prefer water-based inks over plastisol, because fabric printed with water-based inks, unlike plastisol inks, have a “soft hand” feel. This, in turn, is because water-based inks get embedded into the fabric, while plastisol inks sit on top. In addition, they are more environmentally friendly. Best of all, water-based inks don’t crack or fade. One thing to remember is that they work best on 100% cotton fabrics, lightweight and stretchy fabrics like rib and bamboo, and garments such as towels.

Water-based inks are very transparent inks with a low opacity (brightness), which means that on light shirts the colors are bright, but not on dark colors. Some firms offer H.O. (high opacity) water-based inks which show better on dark-colored garments while maintaining the “soft hand” feel.

Advantages:

  • Embeds into the fabric
  • “Soft hand” feel
  • Vibrant colors
  • Great for dark-colored garments

Disadvantages:

  • Setup time is labor-intensive
  • Full-color printing is difficult
  • Fine detail can be difficult
  • Exact matching Pantone is not guaranteed
  • Does not work well with dyes such as royal blue and purple.

Conclusion

So, is heat transfer or screen printing the better option? The best answer is that each serves its own purpose, so “it depends”. To summarize, if you’re doing a smaller job with complex designs, several different designs, or variable parts such as team member names or numbers, heat transfer is probably the best bet. On the other hand, if you are doing larger orders (especially ones with solid colors) screen printing is better.

Whichever method–screen, heat transfer, or both you use for your jobs, OnSite All-In-One Business Management Software is specifically designed to handle the entire process. Learn more about how you can customize OnSite for your needs and sign up for a demo here.

screen printing

The History of Printed T-Shirts

The History of T-Shirt Printing

The printed t-shirt is a global icon of pop culture—the foundation of the decorated apparel industry, the epitome of cool casualness. Have you ever wondered about the history of t-shirt printing and where this institution came from?

The roots of the decorated apparel industry go back to ancient China, where the technique of screen printing (a form of stenciling) was developed sometime during the Song Dynasty (960–1279 AD). Originally, the process used silk screens, hence the other popular name silk screening. Over the years, the technique expanded with new methods spread to other Asian countries like Japan and was furthered by creating newer methods. It was Europe from Asia sometime in the late 1700s but it wasn’t popular until later.

An even older textile printing method, woodblock printing, had also been invented in China about 220 AD and was introduced to Europe in the 1100s. European dyes, however, tended to liquefy when wet, limiting use to items that did not need to be washed. This limitation was overcome when the French discovered methods for washable dyed fabrics from India, and it caught on rapidly in France and later in England.

At about the same time that screen printing was introduced to Europe, the British textile industry, which had been steadily expanding since the late Middle Ages, became the first major industry to be industrialized. Starting with the “flying shuttle” in 1734 and going on to steam-powered factories in the early 1800s, industrial inventions made mass production of textiles and garments practical and slashed production labor costs.

As the Industrial Revolution proceeded, one of its inventions was the union suit undergarment that was popular in the 1800s. In time, the one-piece suit was split in half, with the top half (with or without buttons) becoming a separate shirt extended somewhat so that it could tuck into the lower half, now separate pants—Later in the 1800s, miners and stevedores adopted wearing it as their main shirt in hot environments.

T-shirts became popular in the U.S. after the Spanish-American War when the U.S. Navy issued them to sailors. They were crew-necked, short-sleeved, white cotton undershirts for wearing under a uniform. Soon sailors and Marines in work parties, the early submarines, and tropical climates commonly removed their uniform jackets, wearing (and soiling) only the undershirt. From there, it spread to agricultural and other workers. Boys soon picked it up, and it was widely used as an all-around work shirt by the Great Depression. When the soldiers came home from World War 2 and wore their issued t-shirts at home, they became even more popular.

Also in the early 1900s, various methods of improving on-screen printing were developed. Eventually, the National Serigraphic Society formed to promote it as an art.

The history of t-shirt printing really came together in the early 1950s when several companies based in Miami, Florida started to decorate T-shirts with resort names and characters. The “ringer” t-shirt (one-color shirts with contrasting collar and sleeve band ribbing), along with tie-dyeing and screen-printed shirts came out in the ’60s and they instantly became the “uniform” of rock-n-rollers, hippies, political protestors, and drug heads. Popular designs from the period included swirling multi-colored designs, happy faces, the face of Communist revolutionary Che Guevara, and the famous “I ♥ N Y”. Finally, the plain white t-shirt became popular after Hollywood actor Don Johnson wore one onscreen in the 1980s.

decorated apparel industryAs t-shirts became popular, screen printing was even more improved. American entrepreneur, artist, and inventor Michael Vasilantone began to develop, use, and sell a rotary multicolor garment screen printing machine in 1960. This quickly became the most popular garment printing machine (and still is today), and garment printing also became the most popular form of screen printing.

In the 1970s, major brands started to use t-shirts as a form of advertising. Starting with Coca-Cola and Disney products and characters, it spread, with many companies printing shirts with their logos on them (along with ball caps). Movie and TV-based shirts were developed as well.

In the early 2000s, humorous, political, and “statement” t-shirts became the rage, especially after pop celebrities started taking them on. They are also hugely popular for events, charity causes, and local businesses. As of 2015, the t-shirt shows no sign of decreasing in popularity as casual is still cool and even fashionable—even as some minor trends show an increasing interest in more professional-looking (and often embroidered) polo shirts, uniforms, and more modest clothing.

Now, for a completely useless trivia fact from Wikipedia:

“The current holder of the Guinness World Record for “Most T-Shirts Worn at Once” with 257 T-shirts is Sanath Bandara. The record was set in Colombo, Sri Lanka, on December 22, 2011. The record was attempted on stage in front of a crowd of people in a public park in Colombo. Bandara surpassed previous record-holder Hwang Kwanghee from South Korea, who had held the record at 252 shirts.”